
We can all agree that Salesforce’s new(ish) Lightning Platform brings a ton of great new capability to our lives, but sometimes, it can be tough to know it all. Today, I’m focusing on one of my favorite Lightning Page tips and tricks and walking through how you can use the Related Records component to provide great value to your end users.
But Wait, What is a Lightning Page?
For any new folks, a Lightning Page is a new way to interact with your Salesforce records and apps. You can create a new page experience to display an individual record, a home page for your app, or an app page that you can host within a custom tab to display to your users. Lightning pages can contin your standard page layouts and so much more with Lightning Web Components (LWC).
So, let’s talk Related Records.
My favorite component for Lightning Pages is the Related Record component used on Lightning Record Pages. This component allows you to pull in an action you’ve created on either the record you’re viewing or any other record linked to the current one via a lookup field. And you can use these actions to either be a window to view your related record, or to highlight fields that need to be edited together for easy access!
Here’s why I love them so much:
- For cross-team collaboration, it can help give one team access to another team’s information without needing to navigate to other records, meaning less clicks.
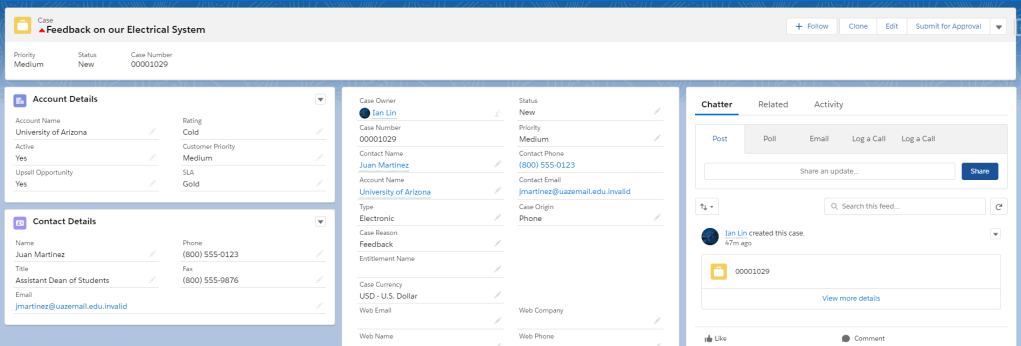
- For a great customer experience, agents can have information they need at their fingertips. For example, in the above case, the service agent can see at a glance that there is an upsell opportunity on this account, and that they have a Gold level SLA, so they need a response quickly.
- Better team metrics are right around the corner: using the Related Records component means users don’t need to spend time opening up additional records, especially when they just want to view a couple of pieces of information that are relevant to their team.
Now how do I use these components?
Let’s walk through the steps.
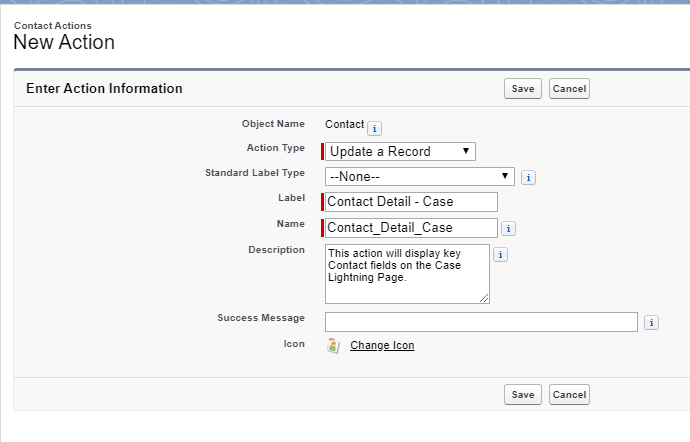
Step 1:
First, identify the objects that are your primary object (the object that the Lightning Page will look at) and related objects (the object that your Related Records component will look at). For each of your related objects, create a new Action.
You will want to use an Update A Record action type. I recommend using a naming convention that will be descriptive (what is it, where will it be used) and leave notes for other admins in the description field.
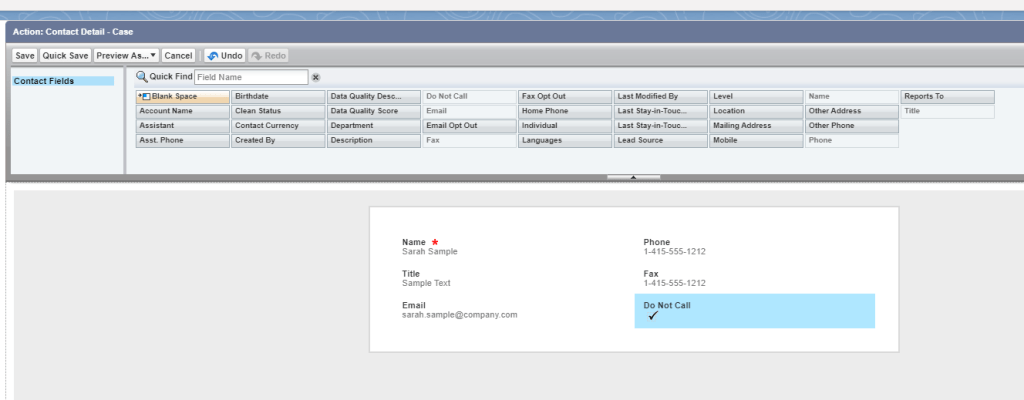
Step 2:
Choose your fields to include. I recommend working with your teams to ask: “When you navigate to the other record (account page, contact page, etc.), what fields are you looking for?” In my example below, I’ve chosen fields that the agent may need to use to reach this contact. In the full page photo above, you can see that I’ve chosen fields that specifically relate to a service agent’s normal actions.
Drag needed fields onto the canvas and save.
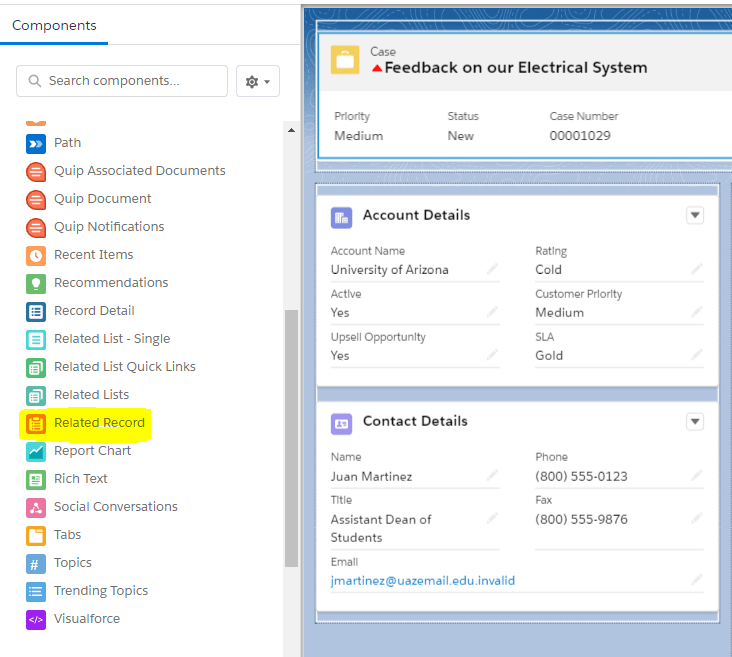
Step 3:
Next, move to your Lightning Page. I like to use the layout tempalte of “Header and Three Columns” because it allows agents to see everything they need to without clicks or scrolling. Then, add the Related Records component to your canvas from the sidebar. Here, you can see I’ve placed mine on the left sidebar of my page.
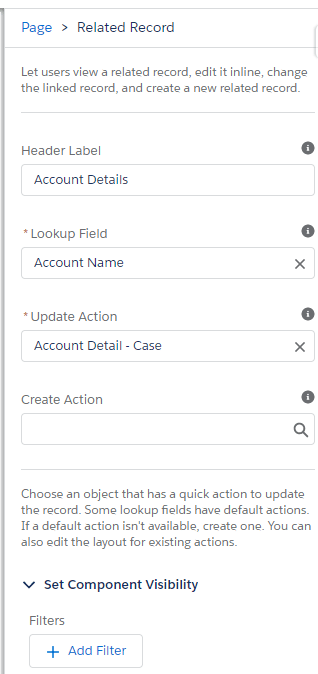
Step 4:
Finally, configure settings for your component. This includes giving the component a title, making sure you’re choosing the correct lookup field to connect to your related record, selecting the action you created, and deciding whether or not you want to allow people to create new records from this component. For example, do you want agents to create a new contact to replace the one currently linked, through this record? Up to you!
Another thing I love to do is play with component visibility. Maybe you want to make this component available specifically to profiles for service super-users. Or to account management teams whose function crosses multiple other teams. Or you can display the component based on information in your primary record itself. The formula’s the limit!
At the end, you’ll have a page where a user can view their page layout with needed record fields, but also see exactly what they need of other records to provide the best value to your customers.

Reviewing this page as a whole from our service agent perspective, we can see key case details in the highlights panel at the top, giving our agent–or anyone else working with the customer–quick facts to get up to speed. In the center, full case details let us know what’s going on with the case so the customer can trust the information we have, and thus, trust us! On the right, a few tabs with a chatter feed, related lists, and activity stream, and finally, on the left, our related records! With this single view page, agents are ready to handle customer issues quickly, efficiently, and without extranneous action.
Questions? Let me know in the comments below, or tag me @allawler!
-Allie
